I am happy to share a guest fly tying video from Darren at Piscator Flies. Darren shows us how to tie the Chaddock which was a pattern created by Karl M. Haufler. A great pattern to imitate leeches and is great for lakes and ponds.
Click Here to check out this guest video on the Chaddock:
Fly Materials for the Chaddock (variation)
Hook: Mustad 38941 #4-8 or 4-6xl hook
Thread: Black 6/0 140d
Butt: Red wool or chenille
Rear Collar: Peacock black schlappen
Ribbing: Medium silver oval tinsel
Body: 4-6 peacock herls
Collar: Peacock black schlappen
Chaddock Summary
The pattern was created by Karl M. Haufler of Edmonds, WA. The fly was designed to mimic a leech and is quite effective in lakes and ponds whether leeches are present or not. It is said to be especially effective with brook trout and the Lahontan cutthroat subspecies.
The original pattern uses a dark green phase peacock breast for the collars, but I’ve replaced this with natural black schlappen which is easier to obtain. Black hen hackle (whiting American) may also work for this purpose.
I wanted to give a big thanks to Darren for taking the time to post this great video. Please click here and thank Darren if you get a chance.
If you like this video and want more fly tying videos delivered to your inbox, click on the button below and leave your email.
I show you how to tie the Green-Butt Skunk Dark in today’s fly tying tutorial. The green butt is a classic steelhead fly and today demonstrate the classic hair wing style.
This fly works great swinging for summer steelhead but is an all around killer steelhead color (click here to see a post that describes steelhead fly colors).
Click here to watch the video for the Green Butt Skunk Dark (one update on hackle: I use Teal Flank Feathers, not Guinea for the tail and hackle – Oops) 🙂
This video is part of the 30 Day Fly Tying Challenge. If you want to check it out goto Instagram and search for #flytyingchallenge30
Thanks for checking out the pattern and sorry for the confusion on the Guinea and Teal feathers. If you have any other questions about this or any other patterns please let me know.
Click the link below and subscribe with your email if you want the next fly tying video delivered to your inbox.
Jay breaks down the color combinations into three tiers and gives a few more tips during the discussion.
Here are the 3 tiers of Steelhead Colors:
Top Tier = black, blue, purple.
Middle Tier = pink, orange, red.
Bottom Tier = olive, chartreuse.
Noting among other things that black, blue and purple are the top tier or best colors to use for steelhead fishing for him especially in the Northwest.
Of course, this is just an opinion piece and much of the hard work with fly fishing is getting your fly in front of the fish and presented correctly.
But at the end of the day, when choosing colors for steelhead, you can’t go wrong with dark colors overall for winter steelhead.
Deneki outdoors also posted a short video on fly colors that you can check out here:
Tom covers when to choose certain colors for different water and weather conditions. For example, a darker fly is better when the stream has color or on cloudy days. And larger flies work better for colder rivers.
And if you’re interested in the right spey rod for steelhead, Click here to see the Echo Spey Rod that has helped me drastically improve my spey cast and find more steelhead at a super reasonable cost (You also get a free spey line if you pickup the Echo Spey). By the way, the link above is an affiliate link, which means I earn a commission if you do end up purchasing through that link. It’s at no extra cost to you, and please if you have any questions related to this product, please let me know and I’d be happy to answer them for you.
I show you how to tie the dropper loop in today’s fly fishing video tutorial. The dropper loop knot is great for nymphing when you want to fish a second fly off of the leader. The dropper is a knot that does not get tangled easily and is easy to fish.
I demonstrate how to tie a Guide’s Choice Hare’s Ear in todays fly tying video. The Guide’s Choice is widely considered one of the best all around nymph patterns.
No secret why, as it blends just about all of the finest trout materials you can think of. See the materials list below.
Click Here to watch the video on the Guide’s Choice Hare’s Ear:
Guide’s Choice Hare’s Ear Fly Tying Materials
Hook: Daiichii #1710 Size #12
Bead: 1/8″ Brass Bead
Thread: Black size 70 Ultra thread
Tail: Pheasant tail mixed with dark hare’s ear
Rib: Medium Gold Tinsel
Abdomen: Dark Hare’s Ear Dubbing
Thorax: Peacock
Wing case: Pearl Flashabou
Hackle: Partridge
If you have any other questions please send me an email and I’ll get right back to you. What’s your biggest struggle with fly tying right now? Leave a comment below.
If you like this post and want more fly tying videos delivered directly to your inbox then click the green button below and enter your email.
Are you totally new to fly fishing and wondering how someone could cast a fly line 100’s of feet? Maybe you’ve been out on the river only to “snap” off a bunch of flies? Or you just have no idea how to cast a fly rod and need a little help?
Follow along below and I’ll provide some quick tips and links to awesome resources on this topic.
Sound good? If you have a little experience and need a little more advanced content on fly casting take a look at this link: 9 tips on Increased Fly Casting.
How to Cast a Fly Rod – 7 Steps
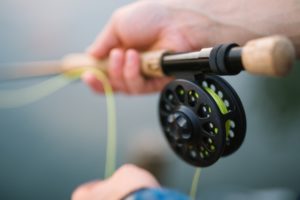
1. Fly Fishing Gear
The first step to the fly cast is making sure you have a balanced outfit. Take a look here to see a few resources to make sure you find the right gear.
The Reel weight, line weight and rod weight should all be balanced in order to make an effective fly cast. Start with a balanced outfit and your life will be much easier as you get into this.
2. Where to Practice Casting
The best place to practice casting is on the water so if you can find a nice calm stream or lake nearby go there.
If you only have a grassy yard, you can still practice there. You can tie a small piece of yarn in place of a fly on the end of your leader to help simulate the fly. The yarn will stick to the grass a bit and help to load the rod.
There are a few basic knots you should learn for fly fishing but the yarn knot can just be as basic as you need to get it done.
3. How to hold the fly rod
There are numerous ways to hold a fly rod and at the end of the day it comes down to what feels comfortable for you. The most common grib for average length casts is the thumb on top of the cork.
One important point that Pete makes in the video below is, regardless of the grip you choose, to use a relaxed grip and don’d grip the rod too hard.
When starting out casting a fly rod I recommend that you start with a very short amount of line (20′ range) and keep all of the extra line on your real to remove distractions.
If you are right handed, go ahead and pinch the line with your index finger down onto the cork of the handle. This will assure that no line zips off while casting.
Eventually you’ll be stripping out line, double-hauling and doing all sorts of extra stuff but we don’t have to think about that now.
Just strip out 20 feet or so of line and start practicing.
5. How to pickup and load the rod
One of the most important things to remember when you start your back cast is to make sure your line is straight out in front of you and does not have a lot of slack or bends on the water.
The less slack (bends and squiglies) you have when your line is on the water the more effective your cast will be.
When you pick up the rod the most important piece is that you are using a smooth excelleration on the pickup. The herky jerkey pickup will not transfer the energy effectively to load the rod.
Episode 233 will probably go down as one of the best podcast episodes on fly casting.
Loading the rod essentially means transferring energy from the pickup into the back cast. A good analogy to use for the pickup of the backcast is that of a paint brush. Imagine you dust dipped the brush into a bucket of paint. Now, pull it out without dripping and execrate back until you get to the pause. Try to throw that paint brush off without loosing any.
Note: Draw a straight line between your back and forward cast. In oder to efficiency transfer the energy, the line should be on the same plane and 180 degrees opposite on the back vs. forward cast.
6. How to stop the rod
Once you pick up the rod and line with a smooth excelleration you will need to stop (pause) the rod when you come to the point where you transition back into a forward cast.
This is the 2′ o’clock of 10 and 2. But, it might be more like stopping at 12 O’clock in many situations. (Just think of the hands on an old clock).
If you don’t pause for a second and let the line load up, you’ll here a snap on the forward cast. That’s your leader and fly snapping.
If you wait too long on the backcast your line will drop behind you and may hit the ground. Fly casting is all about timing and a 1/2 second can make all the difference.
Once your line loads on the back cast with your pause, you can then transfer that energy to the forward cast.
Note: It’s a good idea when starting out to look at your backcast and make sure the line is loading up correctly. You’ll know it is when the line is straight out behind you. (So, take time and look back at your cast to see if it’s loading straight behind you)l
7. The Forward Cast
After you have made that quick pause and loaded up the rod, you can now make a forward cast. On the forward cast bring the line forward 180 degrees from the backcast around eye level.
Stop the forward motion around 10 O’clock and shoot the line out. Don’t be afraid to really shoot the line out and excentuate the motion if needed early on. After the line shoots out in front of you, drop your rod tip down to the water to finish up the cast.
Once the line hits the water you are fishing and can follow your fly.
8. Other Casts
There are a bunch of other casts you will learn eventually like the roll cast, side cast, spey cast and the list goes on and on.
I did want to share the reach cast which can be very helpful in certain situations. Here’s a video link for the reach cast.
This cast can be very effective especially when fishing dry flies. You are able to give your fly a little extra drag free drift with the reach cast.
The double haul is another advanced method that will help getting more distance for your cast. If you want to take a sneak peak Simon shares a few tips below:
Tips and Tricks
The most important thing you can do when getting started fly casting is to practice and practice.
I always love that clip. But regardless of Allen’s take on it, practice is super important.
Another important thing you can do is to find a mentor to help with your casting. Set a goal to find one person who has some skills to critique your cast.
I was listening to a podcast recently where Steve Rajef describes how a mentor at the San Francisco casting club helped give him a big start to his casting career. Although you might not have a casting club nearby, there are plenty of other resources out there.
Fly casting is one of those pieces to the fly fishing puzzle that is necessary, but you don’t have to be a master fly caster to catch fish. In fact, many of the fish we catch are within a few feet of the bank.
So, the next part of the equation after getting your gear and casting down is to read water in the areas where you plan on fishing. We will talk about this in an upcomming post.
Conclusion
The fly cast is all about nice fluid motion and timing. You will only get this nailed with practice and time. Remember to pick up and start your backcast with a nice constant acceleration.
Use a soft grip but squeeze the grip when you stop to help load up the rod. Now, transfer the energy back into your forward cast and stop when you are around 10 O’clock or when your line is around eye height.
Don’t be afraid to put some power into your cast. One of the great thing you have going for you is that most of the gear on the market
Click on the button below to get more info like this sent to your inbox:
When was the last time you listened to a podcast or interview that really moved you to do something? Maybe it was a video that convinced you to actually get out and take action? How about something as simple as Spey Casting Tips?
I am obviously a little weird and extreme when it comes to fly fishing but that happened to me today listening to Anchored where April was talking to Pete Humphries on spey casting and life.
If you are in the midwest and need a steelhead guide you can connect with Pete at the link above. Tell him I sent you so we can have a good laugh!
Pete did a really amazing job describing the spey cast using analogies and tips that made it almost like you were watching him fish.
I had to post a short article so I didn’t forget these awesome analogies! Much of this applies to shorter belly lines so keep that in mind if you are going old school spey.
I’m just going to provide my short summary for future reference (don’t hate me for the choppyness of this post).
If you click on this link: Spey Casting with Pete I link to the podcast I mention above and start it right where April “Gets Nerdy” which you gotta love.
The Lift
All spey casts begin with a lift!! (Not with a drag)
You need to get your line off the water to begin your cast.
Circle C
If you use a good lift at the start then you can use a Circle C (instead of snap T) and avoid doing a roll cast downstream before each cast. This will mean your fly is in the water longer.
The Tear
On setting up your anchor, drop your line directly under your rod tip. This will create less slack and better tear (You will have a better white mouse).
This is different from dropping the line close to your body as happens a lot on a snap T. I always struggle with this one.
The Sweep
The sweep is the same as the backcast with the single hand rod.
You need to sweep up to the home position (not down). Never dip. You can tap the water before starting your sweep to force yourself to always sweep up.
Smoothness is the key! Slack is your enemy.
The White mouse – He talks to you so listen to him. The white mouse is the tear you hear as you are sweeping over to 90 degrees with your rod in front of you then up to the home position. The white mouse also gives you the timing (when he stops you are ready for next step).
Drift
At 90 degress (your rod is pointing directly to other side on sweep) you have to slow down so you don’t pop your anchor. Then slowly decelerate until you are at the fireing position.
Note: The great spey casters can hold their D-loop for a long time.
Smoothness in the entire spey cast is the secret
Forward Stroke and Awesome Analogies
The Telephone Analogy – That’s where Pete likes to start his forward stroke. He’s tells his students 10:30 and 1:30 on the clock.
The Baseball Analogy – I really love this one since I was a centerfileder. This applies to the trajectory of your forward stroke. If you are throwing a ball towards home plate from outfield you aren’t going to release the ball parallel to the ground. You are going to release it at a higher trajectory so the ball goes a little upwards.
Same with the spey cast. We are not shooting this thing into the water.
The Dining Room Table Analogy – Imagine that there is a dining room table in the river out in front of you where you’re casting. Dry to land the fly right on that table. Not on the surface of the water.
Look at your elbow to see if you have a good forward stroke. There should be a bend in your elbow.
The 2 Handed Sledge Hammer Analogy – When finishing the final part of the forward stroke imagine that you have a two handed sledge hammer and you’re driving a nail into the way. That’s how you want to finish the forward stroke. (You can’t use your wrist here so don’t use it on your cast).
Grip – Use a light grip on your upper hand. Try taking your thumb off the cork on the top hand and use your lower hand for the power.
Conclusion
So there you have it. Kind of random but I think totally worth writing down and sharing. What was your favorite analogy? Share it in the comments below.
I wanted to give a big thanks to April Vokey for the podcast and Pete Humphries for the great info. Take a look at the links below if you have additional questions.
Click on the button below and subscribe if you found a good tip and want the next spey casting article delivered to your inbox.
If you need any additional help you can reach out to me anytime with your questions. Please click the green button and subscribe if you want the next post delivered to your inbox.